
Case Description
From prototype to provisional, this case demonstrates how a coordinated workflow using LuxaFlow, Luxatemp, LuxaGlaze, and TempoCem ID (DMG) delivers a predictable, esthetic outcome. By validating the desired result before preparation and carrying that design through to the provisional phase, I was able to provide the patient with a highly polished, functional restoration that served as an accurate preview of the final treatment.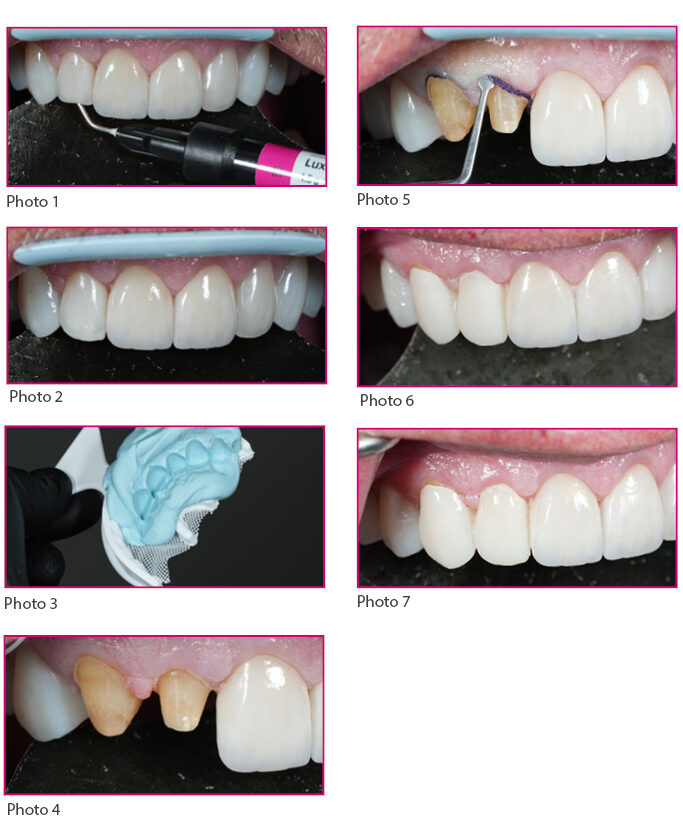
The patient presented with a fractured incisal edge on an existing crown (fig. 1). A direct composite repair was performed using LuxaFlow (DMG), a restorative flowable composite, to re-establish the lost incisal length and contour, allowing the desired tooth proportions and esthetic outcome to be evaluated prior to definitive treatment. The composite addition restored the incisal edge and served as a chairs (fig. 2).
A silicone index was fabricated from the modified restoration to accurately transfer the approved design (fig. 3). This matrix was then used to fabricate the provisional restoration, ensuring replication of the validated incisal length, contours, and overall esthetic design.
Following approval of the prototype design, the teeth were prepared conservatively for the definitive restorations (fig. 4). The preparation respected the newly established contours and incisal length, ensuring adequate space for the final ceramic restorations while preserving as much tooth structure as possible. Retraction cord was carefully placed to achieve optimal soft tissue management and expose the preparation margins (fig. 5). This step allows for accurate impression capture of the finish lines and surrounding gingival architecture.
Provisional restorations were fabricated using Luxatemp based on the approved prototype design. The provisionals maintained the established esthetics, function, and phonetics while protecting the prepared teeth during the laboratory phase. The restorations were then cemented using TempoCem ID, providing reliable retention while allowing for easy removal at the delivery appointment (fig. 6).
The provisional restorations were finished, polished, and glazed using LuxaGlaze to enhance surface smoothness, esthetics, and patient comfort. The result was a highly polished provisional restoration that closely mimicked the appearance and feel of the definitive restorations, allowing the patient to evaluate and approve the proposed esthetic and functional outcome before fabrication of the final ceramics (fig. 7).
For cementation, we are using TempoCem ID. One of the advantages of this temporary cement is its natural color, which blends well with both the provisional restoration and the surrounding gingival tissues. Additionally, it provides slightly greater retention than many conventional temporary cements while still allowing for predictable removal when needed.
A small amount of cement is applied to the intaglio surface of the provisional restoration. There is no need to overfill the restoration, as a controlled amount minimizes excess cement and simplifies cleanup. The provisional is then seated and the margins are carefully evaluated with an explorer to confirm complete seating.
Once proper adaptation is verified, excess cement is removed. As you can see, the flow and viscosity of TempoCem ID make cleanup straightforward and efficient. Initially, a Benda Brush is used to remove excess material around the margins. As the cement reaches a more gel-like consistency, an explorer can be used to further refine and clean the margins.
The final step is flossing the interproximal areas to remove any remaining cement residue and ensure clean, healthy embrasures. This simple but critical step helps maintain tissue health and patient comfort while ensuring a well-finished provisional restoration.