Written by Drs. Augusto Robles and Nate Lawson
Case Overview
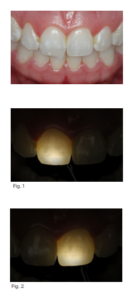
A 30-year-old patient complained of white anterior discolorations which were present on her teeth since childhood. The white lesions were present on teeth 6-11 (Fig. 1).
Utilizing transillumination as a diagnostic tool to determine facial lesion depth
Transillumination is defined as the passing of a strong beam of light through a part of the body for medical inspection. It is a method of examination by the passage of light through tissues or a body cavity. Transillumination is an effective tool in determining if resin infiltration with Icon is a viable treatment option for facial lesions cases.
For this case, the teeth were transilluminated from the lingual side to examine the depth of the lesions (Figs. 1, 2). The lesion did not significantly block the transmission of light through the teeth, which determined that the lesion was superficial and would be appropriate for resin infiltration treatment.
Procedural Steps
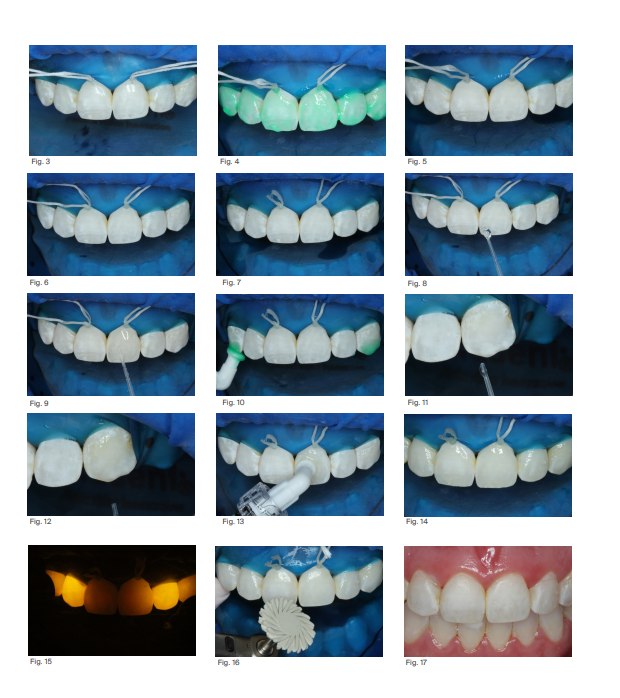
1. A rubber dam and floss ties were placed to raise the dam off the cervical aspect of the teeth (Fig. 3).
2. Icon Etch was applied on teeth 6-11. (Fig. 4).
3. Following the first round of etching, the teeth developed a frosty appearance (Fig. 5).
4. Following the second round of etching, the frosty appearance continued to appear (Fig. 6.)
5. The frosty appearance remained through the third round of etching (Fig. 7).
6. In order to determine if additional etching was required, Icon Dry was applied to the
teeth (Figs. 8, 9). It camouflaged the white lesions on teeth 7-10, but the white
discoloration remained on the cusp tips of teeth 6 and 11.
7. The cusp tips of teeth 6 and 11 were etched for an additional round (Fig. 10).
8. Icon Dry was applied to the cusp tips to provide a preview of the esthetic
improvement expected from resin infiltration, and showed an improved appearance
of the cusp tips (Figs. 11, 12).
9. Teeth 6-11 were then infiltrated with Icon Infiltrant for 3 minutes. The overheard
light was turned off and the infiltrant was continuously agitated on the teeth (Fig. 13).
10. After application of the Icon Infiltrant, the excess resin was removed and the
teeth were flossed (Fig. 14).
11. The teeth were light-cured for 40 seconds on each side. Two curing lights were
used to improve efficiency (Fig. 15).
12. The treated teeth were polished to remove the oxygen inhibited layer (Fig. 16)
Final Result
This patient’s treatment was completed on June 16th and received treatment on the white spot on the lower anterior tooth (Fig. 17). Figure 18 shows the final outcome 3 months after treatment with the teeth fully rehydrated.
Another successful Icon treatment: The patient was pleased with the final outcome!

