by Shannon Pace Brinker, CDA, CDD
Today’s cosmetic dental practices are challenged to provide comprehensive treatments to esthetically demanding patients in ways that cater to their functional and emotional needs. Dentists can capitalize on the inherent interpersonal and communication skills of their dental assistants. By helping to expand their dental assistants’ knowledge and proficiency in different technical aspects of restorative practice, dentists can empower them to accept greater responsibility for communicating detailed case information to patients and laboratory technicians.
In particular, when dental assistants understand and are trained in the use of mounted diagnostic models for visualizing the necessary functional and esthetic changes. This step by step guide outlines how dentists can involve their dental assistants in the planning procedures enquired to provide comprehensive dental treatment, enhance their understanding of the technologies and materials necessary to ensure predictable results, and broaden their familiarity with occlusion/function principles.
With today’s emphasis on incorporating esthetics with function, conveying the correct esthetics with function, conveying the correct incisial plane via the maxillary cast to the articulator becomes mandatory. A canted incisial plane in the final restorations is esthetically unacceptable and is avoidable by using the facebow.
Accurate Bite Registration Material
Specialized bite registration materials that provide rigid bite impressions are used to capture an accurate representation of the patient’s bite. This critical step in any restorative dental case is required in order to set up proper articulation of dental models, to diagnose movement-related problems, and to ensure a dental prosthetic will fit and function properly. It is important to find a bite registration material that is easy to work with and provides you with accurate results such as O-Bite by DMG. O-Bite is a bite registration material that provides exceptional accuracy and predictability.
Using A Corrected Facebow Transfer
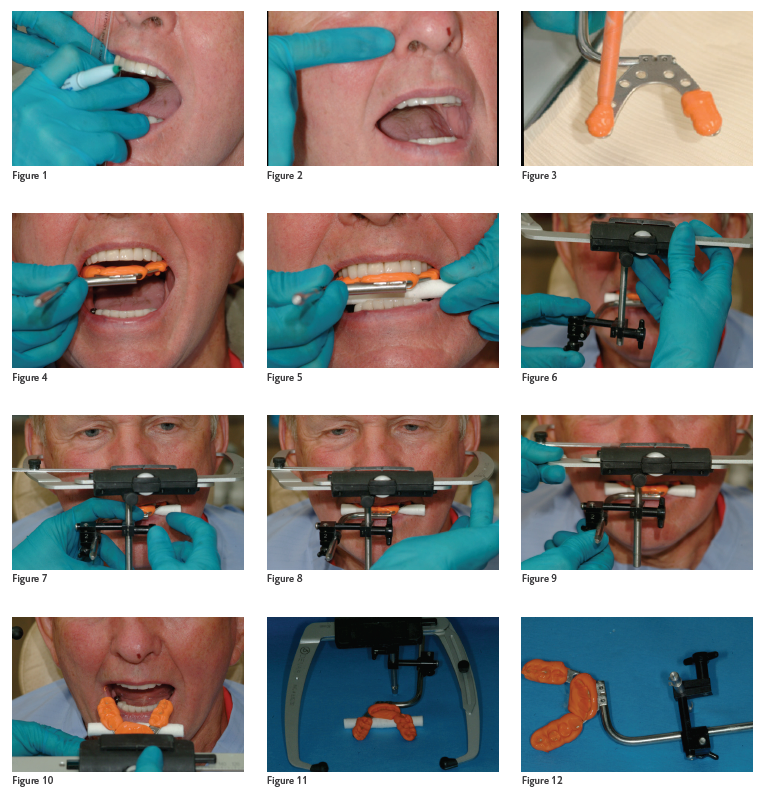
Similarly, the importance of ensuring accuracy when obtaining a facebow transfer may not be fully understood by dental assistants until the rationale for its use is explained. Therefore, cosmetic dentists can ensure their dental assistants’ understanding of why facebow transfers are needed by telling that their purpose is to enable the maxillary cast to be mounted on the articulator in the exact same orientation to the skull that the maxilla is when the patient is standing up straight. Dentists should also explain that the distance from the maxillary incisal edge to the axis of rotation of the mandible should also be duplicated when the facebow is mounted in the articulator.
Here are some materials needed to take an accurate facebow record:
- Earbow
- Bitefork and Transfer Jig Assembly
- Reference Plane Locator
- Reference Plane Marker
- A rigid or reinforced cotton roll
O- Bite Bite Registration by DMG
- Mark the anterior reference point on the patient’s right side.
- On an edentulous patient; measure up from the lower border of the upper lip when in rest.
- Place O-Bite by DMG bite registration on three points of contact.
- With the bitefork arm to the patient’s right, place the fork into the mouth, aligning the patient’s midline with the index notch, so that it is parallel with the patient’s coronal and horizontal planes.
- Place a rigid or reinforced cotton roll under the bitefork to stabilize the bite.
- Attach the vertical shaft to the measuring bow with clamp marked #2 on the patient’s right and tighten the finger screw on the earbow. It is necessary to tighten the finger screw to secure the vertical shaft to the measuring bow and avoid any movement.
- After you have loosened the finger screws on clamps #1 and #2, then loosen the center wheel so that the earbow will open and adjust to the patient’s face.
- Assemble the face-bow on the patient by sliding the bitefork arm through clamp marked #2 as the measuring bow’s earpieces fit tightly into the patient’s ear. Tighten the center wheel on the bow.
Raise or lower the bow so that the pointer aligns precisely with the anterior reference point. If you are aligned with the reference point, tighten clamps #1 and #2. Be Careful not to alter the bow while tightening the clamps.
Loosen the finger screw on the measuring bow, slide open the bow, and remove the facebow from the patient. Detach the measuring bow from the transfer jig by loosening the finger screw. Make sure that the #1 and #2 clamps are secure.
Lastly, the bitefork and transfer jig are placed in a storage medium with the patient’s name, ready to be sent to your laboratory, while the earbow and additional bitefork assembly are ready for the next patient.

