By Dr. Elliot Mechanic
Too often, impression errors are the result of an improper patient bite. Creating a proper bite registration is a critical component of the impression process prior to sending the case to the laboratory. By using the right techniques and materials, a precisely-made bite key can save clinicians and technicians a significant amount of time and money – virtually eliminating ongoing and frustrating adjustments and re-makes.
This article will demonstrate easy and creative paths for producing predictable, high-quality impressions by employing LuxaBite (DMG) for precise lab-friendly bite registrations. LuxaBite is an acrylic-based bite registration material that comes in a standard 10:1 gun. Catalysts and base are included, and the material is dispensed out of mixing tips for predictable mixing consistency. When doing LuxaBite registrations, always use cheek retractors in order to clearly determine if the posterior teeth are completely occluded. In addition, it is important to apply the bite registration material only to the prepared teeth for optimal results.
Case #1
In this case, four anterior teeth are prepared. The LuxaBite material is slightly extended to one tooth (or perhaps two teeth) distally of the preparations.
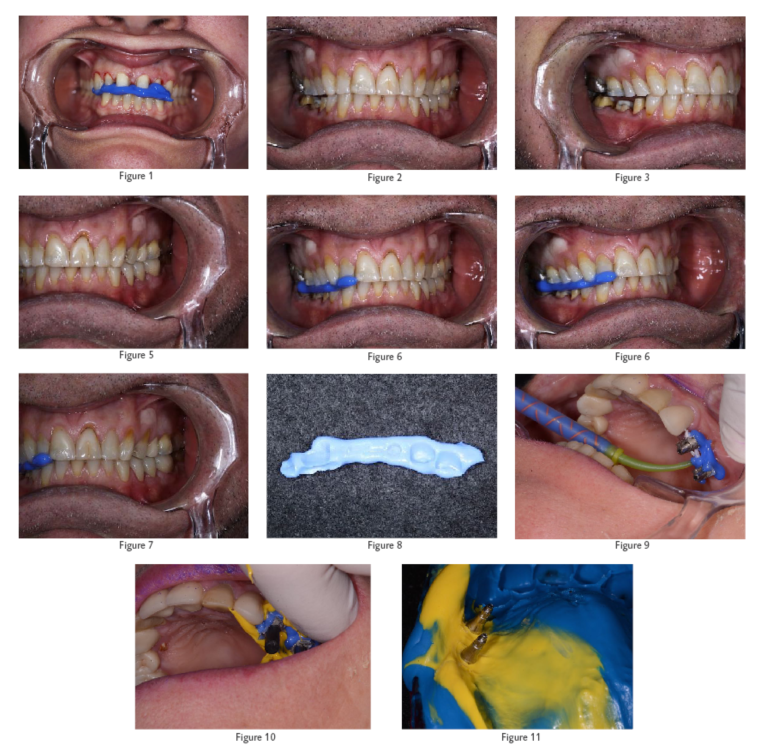
The patient then bites down. For an ideal bite registration, only a very thin layer of the bite registration material is applied. Many dentists mistakenly apply the bite registration material absolutely everywhere and then have the patient bite down – completely unaware of exactly how the patient is biting. The use of cheek retractors allows a clear view of the bite, and the front LuxaBite registration material locks the bite together beautifully in place (Figure 1).
The same bite registration steps can be followed for posterior teeth. After preparing two molars, shown here is a completely stable bite on the opposing side. Once again, applying the registration material only to the prepared teeth or slightly beyond is all that is needed (Figures 2-4).
Closely following these steps will result in predictable, accurate bite registrations. In turn, this simple technique enables the dental laboratory to accurately mount the case, avoiding any consequent adjustments or re-makes (Figures 5-7).
The final LuxaBite registration should resemble an extremely thin wafer so when sent to the laboratory it can be placed easily over the teeth (Figure 8).
Case #2
This next case demonstrates how to take an accurate bite registration using LuxaBite for a full-mouth case. The patient is shown after a month of wearing Luxatemp (DMG) provisionals, and he is biting in full maximum intercuspation with all teeth aligned.
First, the six anterior temporaries are removed. Once again, the bite registration is done using a cheek retractor to clearly see the sides of all six front teeth, and to ensure that all posterior teeth are touching.
The anterior temporaries are then put back on, with one back temporary left in place to maintain the bite on the posterior molars. With all stable points maintained, a completely accurate bite registration is achieved without losing any of the dimensions that were initially established with the temporaries. Moreover, since the acrylic-based LuxaBite material is extremely hard, there is only one possible way for the lab to mount the case.
Case #3
A traditional tried-and-true way of achieving a secure, accurate implant impression is to tie the transfers with dental floss, and then securely bound them together using a strong acrylic-based material. Using this technique completely inhibits any movement and stabilizes the impression.
Implant transfers are easily picked up in an impression, but upon shipment to the lab shifting may occur. Joining the implant crowns together offers complete stability with absolutely no subsequent distortion of the impression.
First, dental floss is placed around the transfers. The LuxaBite material is then applied using a yellow tip from the Honigum Quad Fast (DMG) light-body impression system for fine detailed accuracy. The tied dental floss acts as a matrix, and the abutments are securely bound together with the LuxaBite material (Figure 9).
With the abutments completely joined together, the impression is taken using an open tray. Plastic caps are placed to protect the screws from the impression material. A hole is cut into the impression tray, and then wax is placed over the opening prior to taking the impression (Figure 10).
The abutments are unscrewed, and are now completely locked inside the impression with the LuxaBite material, ensuring no movement upon shipment and pouring in the lab. The acrylic-based LuxaBite material has eliminated the many issues of using a silicone base material where even the slightest movement causes inaccuracies in the impression (Figure 11).

