Written by Jack Ringer, DDS, FAACD, FIADFE
Placing posterior provisional restorations presents a very different set of challenges from placing anterior provisional restorations, not only for dentists, but also for the dental materials they use. With dentistry becoming increasingly specialized, having to use different materials for different procedures can present inventory and financial management challenges as well. Fortunately, the best bis-acrylic provisional material I have found for posterior restorations is also the best bis-acrylic provisional material I have found for anterior restorations: Luxatemp Ultra (DMG).
Though provisional restorations are ultimately discarded after a relatively short period of time, I still desire a material that can not only be versatile for both anterior and posterior conditions, but can generate beautiful and stable esthetics, be durable and long lasting and allow me to create my provisional restorations in an efficient and predictable manner. Luxatemp Ultra is my go-to product, as it is the only material I have found that meets all my criteria.
Posterior Provisional Restorations
Placing posterior provisional restorations should be an efficient, long-lasting, relatively esthetic and inexpensive procedure. This can be accomplished by using thermoplastic buttons, bis-acrylic provisional material and provisional cement. Prior to preparation, a thermoplastic button is heated to soften and then molded onto the tooth to be prepared. Once cooled, the button hardens and is removed from the tooth. After preparation, a shade of Luxatemp Ultra that approximates the color of the tooth is then placed into the button and over the prepped tooth. (Note: Luxatemp Ultra is auto-cure; if a light-cure is preferred, I recommend using Luxatemp Solar. Since the thermoplastic button is translucent, either product can be used with this procedure.)
Once the material has set, it is then removed from the button, trimmed and polished to create an exceptional duplicate of the tooth prior to preparation. At this point, the provisional cement (TempoCem®ID; DMG) is placed into the provisional and seated onto the prep. TempoCemID is the ideal provisional cement, as it sets quickly, cleans easily with a very thin film thickness, and does not impact the esthetics of the restoration.
Anterior Provisional Restorations
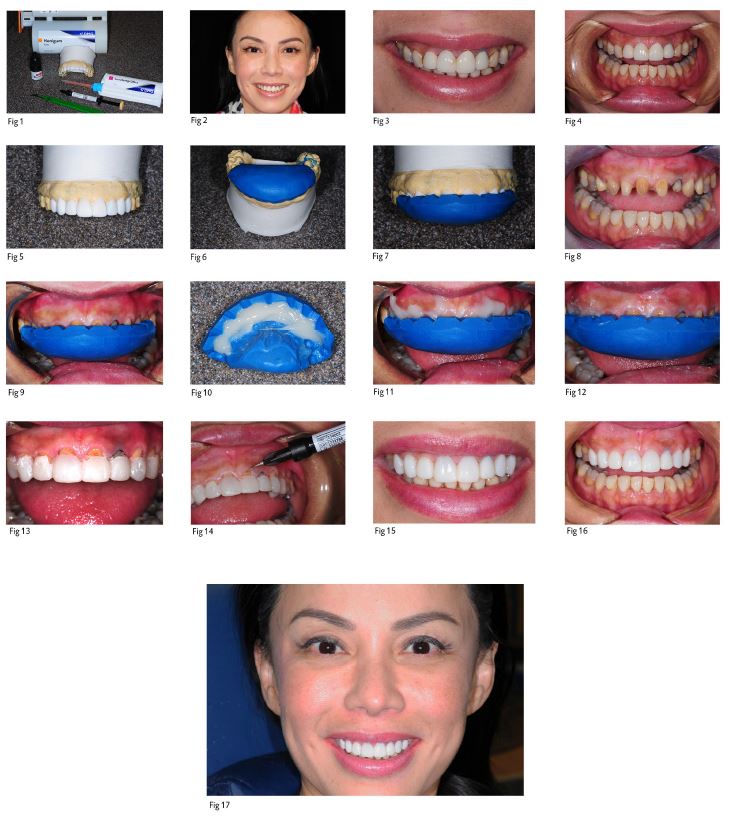
Anterior provisional restorations are quite different from posterior provisional restorations, in that they require the practitioner to create an accurate esthetic preview of the patient’s desired final outcome while still being stable, efficiently constructed and comfortable for the patient. This can be easily accomplished utilizing the following materials: putty, a non-etching adhesive, a bis-acrylic provisional material and a flowable composite. A wax-up of the desired smile is developed and a putty stint (Honigum; DMG) is molded on the waxed-up teeth and then extended onto 1-2 teeth on either side. After the putty has set, it is scalloped around the gingival margin using a #12 scalpel, exposing approximately 1-to-2 mm of tooth as well as the incisal papillae. Once the teeth have been prepped, a thin layer of adhesive (LuxaBond Total Etch; DMG) is placed on the prepped teeth and light-cured. This is followed by placing the desired shade of Luxatemp Ultra into the stint, which is then placed onto the teeth. Before it sets, all excess material is wiped away to expose the 1-to-2 mm of tooth and the incisal papillae. Once the material is set, the stint is removed; with the exception of the gingivally exposed tooth, the provisional should look exactly like the design. At this point, a lower value of flowable composite (LuxaFlow; DMG) is painted onto the exposed tooth, light-cured, and then trimmed and polished. This allows the provisional to have a polychromatic appearance. Moreover, since the practitioner can easily and accurately paint the flowable composite, the material can be kept away from the soft tissue. This makes it easy to prevent the final clean-up and polishing from causing unnecessary trauma to the tissue.
This technique is efficient and inexpensive while generating an extremely pleasing esthetic result.
The Best of Both Worlds
Luxatemp Ultra brings numerous benefits to both the posterior and anterior provisional procedures described above. The benefit that perhaps stands out most is the material’s flexural strength, which enables it to deliver unmatched stability, break resistance and long-term durability. These benefits are particularly relevant in the case of the posterior provisional restorations, as posterior teeth are subjected to significantly greater bite force than are anterior provisional restorations.
The second great advantage of Luxatemp Ultra is that it facilitates exceptionally life-like esthetics and color stability. The material is significantly less porous, much smoother than other provisional materials and polishes exceptionally well to deliver unsurpassed fluorescence. This benefit is especially important for anterior provisional restorations.
In addition to unmatched strength and esthetics, the unique nanotechnology incorporated in Luxatemp Ultra offers several other advantages that benefit both posterior and anterior provisional restorations. Relative to other provisional materials, Luxatemp Ultra restorations deliver a significantly more precise fit, faster curing that allows it to reach its final hardness sooner, easier cutting and handling, and greater clinician control.
In my experience, out of the tens of thousands of dental materials available to dental professionals, only a handful are superior to other category options in virtually every possible way. When it comes to the provisional materials category – whether it be for posterior or anterior restorations – Luxatemp Ultra is truly one of that handful of special products.

