Written by Bruce J. Crispin DDS, MS and Kristi A. Crispin, DMD
Provisional restorations can sometimes be an afterthought and not get the attention they need for optimal results. This is especially of concern in the esthetic zone. In addition, they are often delegated to a staff member that does not have the skill sets of the treating dentist. Whether it is the dentist or a staff member making a provisional in the esthetic zone, techniques must be learned that are time efficient and still provide optimal results. 1
If you promote yourself as a “Cosmetic Dentist” you must be able to provide anterior provisional restorations that meet the following goals:
- The patient should always look at least as good as when they arrived or preferably better. The provisional restoration should be an intra-oral prototype for the proposed restoration. It will allow the patient to “test drive” their new look and provide feedback that can be used to optimize the final restorations.
- The provisional restoration must fit and be contoured to allow for tissue healing and optimal contour formation. Tissue health makes adhesive cementation significantly easier. Optimal tissue contours are essential for an optimal esthetic result.
- Occlusion must not be ignored. Open occlusal or interproximal contacts lead to tooth migration or hyper-eruption that results in excessive adjustment of the final restorations. Developing an optimal anterior guidance, similar to the final restoration, allows for the development of similar functional movements.
All of the above are nice goals but unless easy and time efficient techniques are learned, the end result is usually a compromise. The purpose to this paper will be to present ways to make optimal anterior provisional restorations that meet the above criteria. A time line will also be presented. A provisional fixed partial denture from tooth #6 to #11, that is used in Esthetic Professionals Advanced Fixed Prosthodontics Mentorship hands on exercise will be used to demonstrate the following:
- Basic fabrication technique
- Filling voids and margin correction
- Strengthening Fixed Partial Denture
- Correction mid-line angle
- Length alterations
- Contouring and Polishing
- Color modification with resin tints
- Implant Provisionals
Materials Required
- Diagnostic wax-up and duplicate model
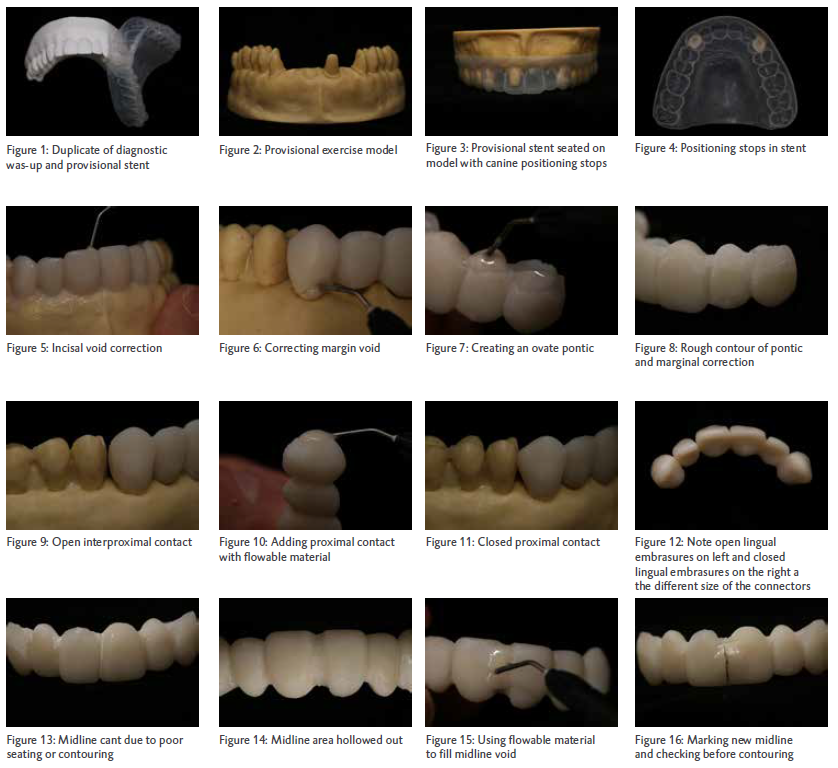
- Clear stent: Vacuum formed or clear PVS (Figure: 1)
- Bisacryl auto cure provisional material (Luxatemp Ultra) and light cure flowable provisional material (LuxaFlow Ultra)
Basic Provisional Fabrication Technique
A 6-unit anterior fixed partial denture model that is used in Esthetic Professionals Dental Education Center’s “Advanced Fixed Prosthodontics Mentorship” will be used for demonstration purposes. (Figure: 2) This part of the process is a standard technique used by everyone so not much will be presented. The prepared teeth are lubricated and a provisional stent is filled with an auto cure bisacryl provisional material (Luxatemp Ultra) and seated into position. A bisacryl material has several advantages over PMMA or VMMA materials and is accurate and safe to use directly in the mouth. The provisional stent must have positive stops to prevent over seating. The palate and adjacent unrestored teeth can provide excellent stops. When adjacent teeth are inadequate, small light cured provisional stops are made on the abutment cusp tips and the position of the stent verified before filling and seating with the auto cure material. (Figures: 3-4) A small amount of the material should be injected onto a work area to determine where the material is in its setting cycle and when it can be removed from the mouth. 2
Filling Voids and Margin Corrections
While the marginal accuracy is very good with bisacryl materials, any voids or bubbles can be easily filled with the flowable provisional material (LuxaFlow Ultra). (Figure: 5) The provisional is now removed from the mouth and trimmed with a medium chamfer diamond (Brasseler 6866.31.016) at high speed and any needed corrections or modifications identified. The provisional is now tried onto the prepared teeth, adjusted internally as needed until seating is complete and final margin adjustment completed. Note that routine internal adjustment should not be necessary because these materials are very accurate. If adjusting on a regular basis, re-evaluate your preparation design and or the stability of your provisional stent. Margin bulk can be removed and if there are any deficiencies, they can easily be corrected with the light cured flowable provisional material and cured. intraorally. Optimizing margins is essential to ensure tissue healing, minimize micro-leakage and protect the prepared teeth. (Figure: 6)3 Pontic contours are also easily modified with light cured flowable material to create an optimal contour. (Figures: 7-8) Any open contacts are also easily corrected with light cured flowable provisional material. (Figures: 9-11)
Strengthening Fixed Partial Denture
Provisional bridges are often made with lingual embrasures because the wax-up was done to look anatomical. When a provisional bridge has both the facial (buccal) and lingual embrasures opened up, the potential for fracture is greater. The solution is to fill the lingual embrasures with the light cured flowable provisional material which will provide additional resistance to fracture. (Figure: 12)
Correction Mid-line Discrepancy
Once the provisional is seated and accurate, esthetic corrections and enhancements can be done. A diagnostic wax up should have been done and duplicated to make the provisional fabrication stent. If the sent was not seated correctly or the wax-up was not correct, modifications will be necessary. The mid-line between teeth #8 and #9 should be vertical. Best to check with a full face image. If the mid-line angulation needs to be corrected. The first step is to open the mid-line embrasure with a chamfer diamond. Next the void is filled with a light cured flowable provisional material. (Figures: 13-15) A new mid-line can be drawn and checked with a full-face image. (Figure: 16) Using a flexible diamond disc (Brasseler 934.11.220), a new mid-line is established and the adjacent
teeth contoured. (Figure: 17)
Length Alterations
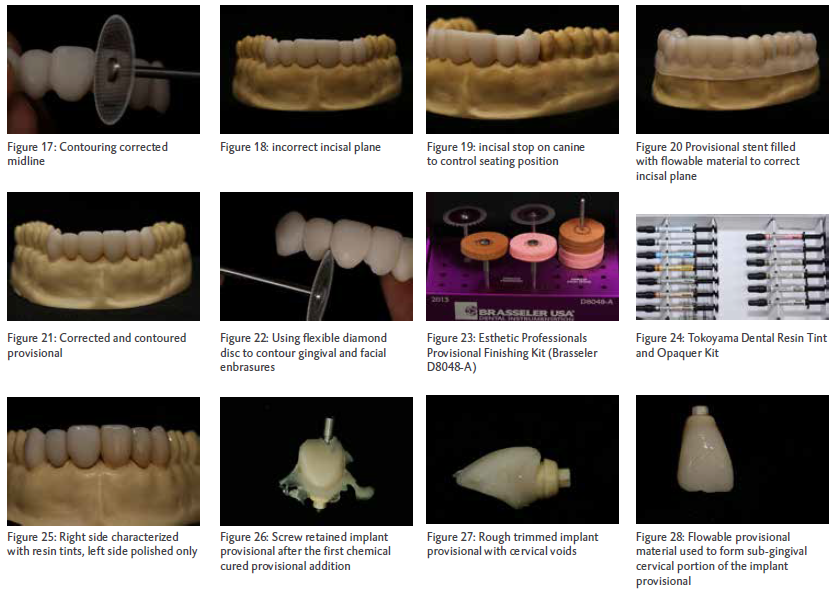
For long span maxillary anterior provisional restorations, positioning the stent is critical during direct fabrication. If it is over seated or tipped, the esthetic contours of the provisional will be compromised. (Figure: 18) Esthetic modifications may also be necessary because the diagnostic wax-up did not provide the desired result. If the provisional is too long, it can be contoured. If it needs to be lengthened, it easily corrected. Simply build vertical stops on the cusp(s) tip of the short provisional(s) to control seating of the stent with light cured flowable provisional material. (Figures: 19-20) the light cured flowable provisional material is added to the incisal of the stent and seated and cured. The vertical stops allow for accurate positioning of the stent and the provisional is easily modified and ready to finish. (Figure: 21)
Contouring and Polishing
Once the margins are completed by contouring with chamfer diamonds and additions made to correct voids, final contouring is done with diamond discs to open facial and gingival embrasures. Multiple unit provisional restorations are splinted together to maintain positional stability. It is important, and often overlooked, to open the gingival embrasures for optimal tissue health. (Figure: 22) After final contouring and occlusal adjustment, the provisional can be polished. (Figure: 23)
Color Modifications with resin Tints
Matching anterior provisional restorations to adjacent teeth or improving the appearance of multiple provisional restorations is easy using high flowable resins or resin tints. (Figure: 24) The provisional restoration should be microetched with 25-50 micron aluminous oxide and steam cleaned or rinsed aggressively. The resin tints are simply brushed onto the surface of the provisional to create the desired esthetic modification and light cured. A thin layer of clear is applied over the tints to enhance their durability. (Figure: 25) Light curing the final provisional while submerged under water will minimize the light inhibited layer.4
Implant Provisionals
Anterior implant provisional restorations are routinely used to maintain or enhance tissue contours and health prior to fabricating the final restoration. Chemical cured provisional material can be used to fabricate the bulk of the restoration. The critical subgingival contours are finalized using light cured flowable provisional material and contoured as desired. (Figures: 26-28)
Timeline
One of the main reasons that provisional restorations are often compromised is lack of time. Most of the appointment is devoted to preparations and impressions and the provisional is done in a rushed manor leading to compromises. Proper timing can open up extra time that can be spent on perfecting a provisional. One of the biggest time savers is to do the initial intraoral provisional fabrication before making the impression. During the 4-5 minutes needed for the impression to set, much, if not all, of the provisional trimming and adjusting can be completed. Using bisacrylic materials like Luxatemp Ultra are quickly trimmed with high speed diamonds. For larger cases, finish the preparations to about 80% and do the intraoral fabrication of the provisional. It will take several minutes to retract tissues and make the impression. During this time, almost any clinical staff member can do a majority of the gross trimming leaving only final trimming for the dentist if desired.
Discussion
Provisional restorations are a critical component of successful restorative dentistry. Modern materials allow for the timely fabrication of high quality provisional restorations that can be achieved by any dentist that is dedicated to optimal outcomes. 5
Disclosure
Dr. B. Crispin is the owner of Esthetic Professionals Dental Education Center, Laboratory and Distribution Center in Tarzana California. He has received materials support from DMG Dental for their academic programs and clinical activities.


References
1. Hammond BD1, Cooper JR 3rd, Lazarchik DA. Predictable repair of provisional restorations. J Esthet Restor Dent. 2009;21(1):19-24; discussion 25. doi: 10.1111/j.1708-8240.2008.00225.x.
2. Strassler HE. In-office provisional restorative materials for fixed prosthodontics: Part 1 – polymeric resin provisional materials. Inside Dentistry. 2009;5(4). http://www.dentalaegis.com/id/2009/04/in-office-provisional-restorative-materials-for-fixed-prosthodontics. Accessed December 1,2014
3. Nagash TA, Alfarsi M, Hussain MW, Marginal accuracy of provisional crowns using three material systems and two techniques: A scanning electron Microscope Study. Pak J Med Sci 2019 Jan-Feb: 35(1);55-60. Doi:10.12669/pjms.35.1.5.
4. Sham AS1, Chu FC, Chai J, Chow TW. Color stability of provisional prosthodontic materials. J Prosthet Dent. 2004 May;91(5):447-52.
5. Luxatemp Ultra. DMG America website. .https://www.dmg-america.com/en/products/product/luxatemp-ultra Accessed December 1,2014.
