Written by Michael C. Fling, D.D.S.
This article describes a technique that not only improves positioning but reduces chair time for more complex provisional restoration fabrication cases.
What is the Shell Overlay Technique?
Provisional restorations have been universally accepted as a necessary and important restorative procedure for decades¹². These restorations are used to verify aesthetics, maintain occlusion, allow for biologic healing³ , and enable patient feedback before final restoration fabrication begins.
Aesthetic considerations of the provisional may include incisal edge position and length, vertical dimension of occlusion, tooth contour, gingival and incisal embrasure spacing, texture, luster and occlusal plane relationships4. Occlusal considerations may include overjet, overbite, anterior coupling, incisal edge pitch and bevel, angle of disclusion, cusp/fossa relationship, vertical dimension and occlusal plane relationships5.
Provisional restorations are a direct reflection of a diagnostic “guess up.” Said another way, the provisional fabrication is predicated on a preoperative model or on a diagnostic wax-up that is developed into “how we think we want it to be.” It is referred to as a diagnostic “guess up” because it is only an estimate until the aesthetics and function are verified clinically. Thus, there is a need for an immaculate diagnostic wax-up or a preoperative model that anticipates the desired final outcome. Stints are made on this wax-up or preoperative model and provisionals are created from these stints.
This article describes the Shell Overlay Technique for provisional restoration fabrication. Previous techniques for provisional fabrication include development of a stint from a wax-up where the stint is filled with a material, such as bisacryl6, and seated in the mouth. After an initial setup phase, the stint is removed, and margins are trimmed. The disadvantage of this technique is that the stint can be positioned incorrectly, which can result in error in an anterior case such as crowning 6-11. This error may take the form of incisal edges that are too short, too long, or excessively oriented toward the facial side or the lingual side. Another possible problem can occur when an entire posterior segment is restored, as the fact that the stint is not vertically stabilized distally can  lead to its incorrect positioning. This can result it occlusal tables that are improperly positioned facially or lingually or positioned too high or too low. Correcting these errors by adding or subtracting material or starting the fabrication over is time consuming and tedious. Fortunately, the Overlay Technique reduces the possibility of incorrectly positioning a stint for provisional fabrication, thereby reducing chair time, increasing predictability, and greatly reducing occlusal adjustment time.
How is the Shell Overlay Technique executed?
While the Shell Overlay Technique can have a profound impact on clinical outcomes and practice productivity, its implementation is quite straightforward.
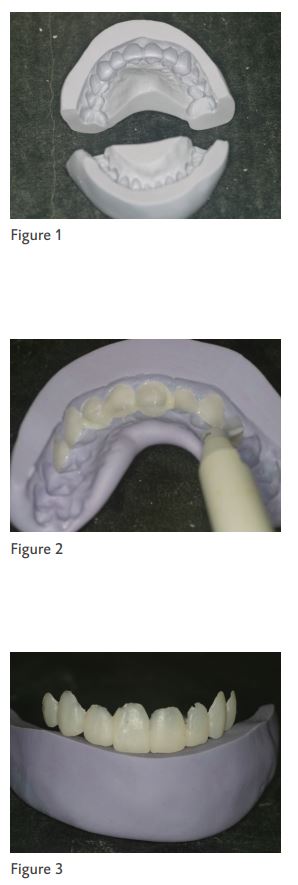
After a stint is fabricated from a wax-up, the stint is removed and inspected for accuracy. The stint is fabricated with enough thickness so that is does not flex. The stint should extend at least one tooth beyond the teeth that are to be restored. (Figure 1)
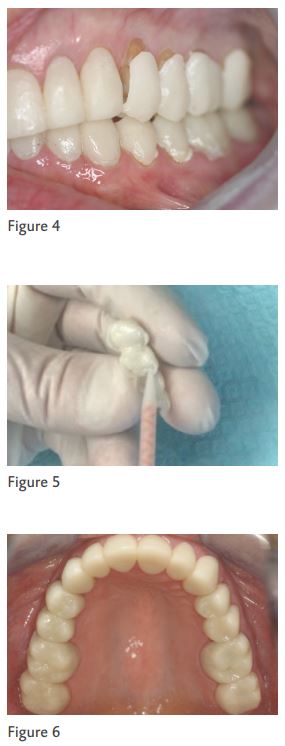
A light cured flowable composite (LuxaFlow Ultra, DMG America) is carefully placed inside the stint on the facial surfaces of the teeth to be restored. A thin instrument may be used to “move” the material so that there is only a thin layer. The stint should be oriented in such a manner that its facial surface is at the bottom, as gravity aids in movement of the material to allow appropriate thickness. The material is cured with a curing light. Then the stint is rotated 180 degrees and the material is placed inside the stint on the lingual portions of the teeth to be restored. Again, this is light cured with the stint oriented so that the material is on the “down” side of the stint. If there is insufficient material in the incisal or occlusal portions, the stint is rotated 90 degrees and more material is carefully added in that area and light cured. (Figure 2)
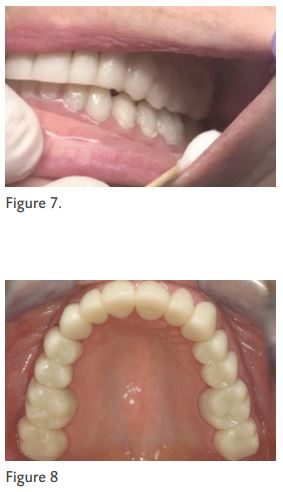
The primary objective is to create a “shell” that is empty in the middle but depicts the outer contours of the teeth to be restored. This shell of material will include the facial, incisal, occlusal and lingual surfaces.
Next, the overlay shell is “teased” out of the stint. Care must be taken, as the shell can be easily broken. Two sets of hands can be useful; one person will wedge the stint apart while the other gently removes the overlay shell. If the overlay shell does break, it is simply repositioned into the stint and more material is added and cured to strengthen the broken area. It is then again “teased” out of the stint as described above. (Figure 3)
After the overlay shell is removed, a diamond bur (016 round end tapered diamond) in a high-speed hand-piece is used to remove the flash and any overextended material.
The overlay shell is carefully trimmed at the margins so that it can passively seat to the correct position in the patient’s mouth. Care must be taken to ensure that the shell can be passively seated in the correct position both facial-lingually and occlusal-gingivally. If margins are too long, the restoration will not seat in the correct vertical position resulting in incorrect occlusal or incisal length. Selective reduction inside the overlay may also be needed to allow it to be passively  seated properly. Margins that are trimmed excessively are not an issue, as the reline material will compensate for that. Margins that are overextended are the primary concern. (Figure 4)
Now that the overlay has been positioned properly with a passive fit, the overlay is removed and a thin layer of adhesive is added inside the overlay and light cured. Next, the overlay is filled with a bisacryl material (Luxatemp Ultra, DMG America) and carefully positioned to the ideal position. (Figure 5)
Acute visual inspection must occur when the overlay is initially seated. This inspection evaluates facial-lingual and occlusal-gingival positioning. Seating position is verified and the provisional is allowed to cure. After hardening, the provisional is removed once again and the margins are reduced and refined with a diamond bur. A thin two-sided diamond disc is used to define and open interproximal embrasures. Provisional refinement, contours and shaping can then occur knowing the provisional is in the correct position. (Figure 6)
When to use the Shell Overlay Technique?
The Shell Overlay Technique has numerous benefits, but it is not required for all cases.
Specifically, this technique will reduce chair time and ensure proper positioning in the fabrication of more complex provisional restoration cases. However, in smaller cases where single units or multiple units are being restored with solid mesial and distal stops, the more conventional technique of stint placement still makes sense.
The benefits of the Shell Overlay Technique are particularly evident in a case in which entire upper and lower posterior quadrants have been restored on the same side. Attempting to achieve stable stint placement with only soft tissue stops can be problematic. While the Shell Overlay Technique will certainly be advantageous with the lower quadrant provisional, the real home run with this technique will be experienced when fabricating the opposing upper quadrant provisional. Many of the same steps previously described are used to develop the upper posterior shell overlay. Careful visual inspection of vertical margin reduction and passive positioning are performed. Once again, a thin layer of adhesive is added inside the shell and light cured. Bisacryl is then added to fill the shell andcarefully positioned.
 However, upon seating, the restoration is purposefully not fully seated into place. Instead, the patient is asked to “close.” As the patient closes his or her mouth, the overlay shell is compressed into position against the previously completed lower opposing provisional. Because the material in the upper shell is still not cured, the restoration can be “moved” in any direction. Visual inspection is used to verify position and the restoration is allowed to cure in place as the patient occludes. (Figure 7)
After curing, the provisional is removed and margins are trimmed, and contouring is completed. The beauty of this technique in this circumstance is the minimal amount of occlusal adjustment that is needed. Because the overlay can be manipulated into position, improper positioning and in turn occlusal adjustments are minimized. (Figure 8)
Summary
The Shell Overlay Technique ensures proper positioning, increases predictability and saves considerable chair time in more complex provisional restoration cases, such as those in which the entire upper and lower posterior quadrants have been restored on the same side.
References
1. Burns DR, Beck DA, Nelson SK. A review of selected dental literature on contemporary provisional fixed prosthodontic treatment: Report of the Committee on Research in Fixed Prosthodontics of the Academy of Fixed Prosthodontics. The Journal of Prosthetic Dentistry. 2003;90(5):474-97.
2. Shillinburg H HS, Whisstt L. Fundamentals of fixed prosthodontics. Chicago, IL: Quintessence Publishing 1997.
3. Buergers R, Rosentritt M, Handel G. Bacterial adhesion of Streptococcus mutans to provisional fixed prosthodontic material. The Journal of Prosthetic Dentistry. 2007;98(6):461-9.
4. Lodding DW. Long-term esthetic provisional restorations in dentistry. Current opinion in cosmetic dentistry. 1997;4:16-21.
5. Regish KM, Sharma D, Prithviraj DR. Techniques of fabrication of provisional restoration: an overview. Int J Dent. 2011;2011:134659.
6. Christensen GJ. The fastest and best provisional restorations. The Journal of the American Dental Association. 2003;134(5):637-9.
