Written by Sarah Winter, DMD
Patient Benefits
When treating patients whose parafunctional habits have caused a loss of anterior guidance and they want a more aesthetic smile, I have found that an anterior 10-over-10 (pre-molar to pre-molar on both the maxilla and mandible) procedure is generally the way to go. Unlike the alternatives of doing one crown at a time over a number of years or placing veneers that will experience compromised aesthetics due to severe wear, a 10-by-10 sets patients up for long-term success by re-establishing guidance that has been lost while also ensuring consistent shade and anatomy across all teeth. When creating the temporaries for this procedure, I use a shrink-to-fit technique in which all of the temporaries are done on one arch simultaneously.
The temporaries are the most important phase of comprehensive dentistry; they’re not just placeholders. And when placing temporaries that must be worn for weeks or even months – such as with a 10-over-10 – it is essential to use a provisional material that is strong enough to stand up to the forces created as the patient establishes a new grinding pattern, and esthetically pleasing enough to give the patient confidence in the relatively lengthy procedure they are undergoing. For years my provisional material of choice for these demanding cases has been Luxatemp (DMG). It is much less porous and much smoother than any provisional material I have used, and as a result it polishes exceptionally well. More important, it is also the strongest and most predictable provisional material I have used.
Case Overview
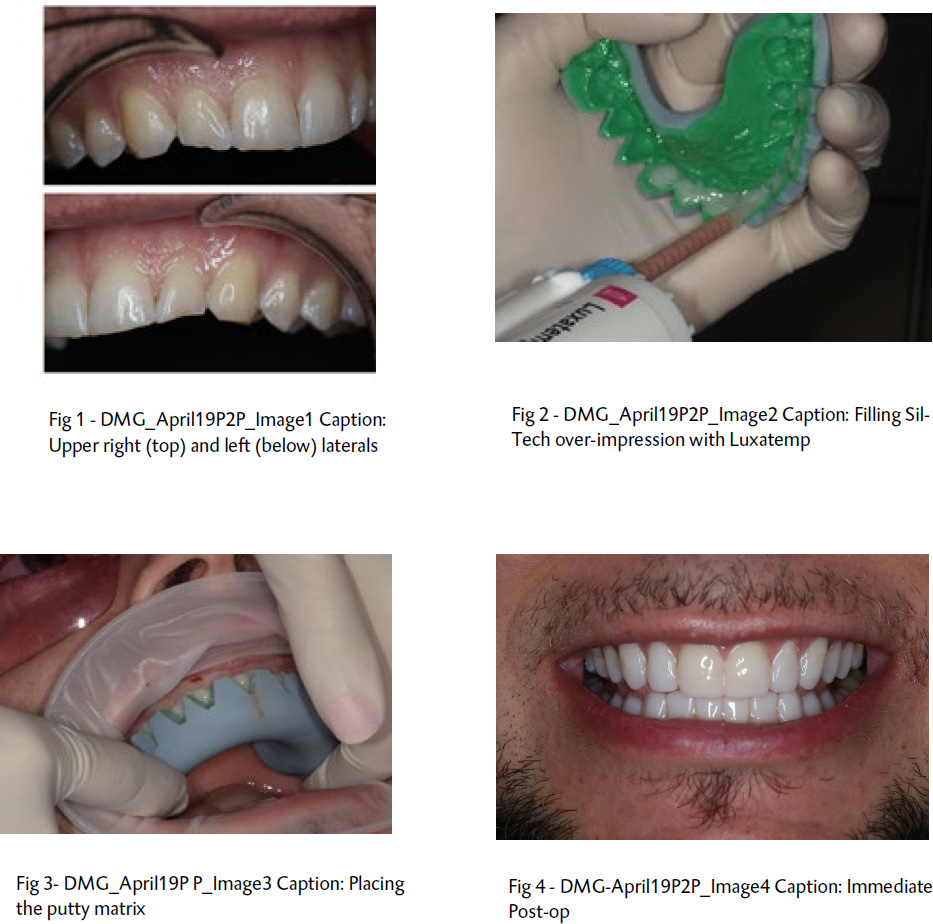
A 30-year-old male patient presented with severe anterior wear, a deep bite, and hyper- erupting mandibular anteriors (Image 1). I determined that I would do a 10-over-10 procedure involving the placement of veneers, and that I would need to keep him in temporaries for about six weeks to allow time to reset his grinding pattern. I initially put him in ortho to get some intrusion of the mandibular and maxillary anteriors and to align the teeth. I did some bone sounding and determined that I only had 0.5 mm to 1 mm to safely use on each tooth. I then did a gingivectomy with a laser to give his teeth some more length. Next, I did a work up and a wax up to make sure the bite was stable and the esthetics were ideal.
Once the prep was done, I took a Sil-Tech (Ivoclar Vivadent) over-impression inside which I placed the Luxatemp for all 20 teeth (Image 2). I used Optibond FL Primer (Kerr) along the gingival margins to seal the margins and prevent micro-leakage. I then placed the Sil-Tech impression in the mouth (Image 3). After about 90 seconds, I pealed it off, leaving the temporaries on the teeth. I then cleaned up the margins, rounded some corners and added some thickness to ensure adequate strength. Next, I went back through all the teeth to open up any embrasures where needed to ensure adequate space between the teeth for flossing. We then polished everything really well, and as a final step, I applied Luxaglaze (DMG) for added protection. The patient was very pleased with both the function and esthetics of the temporaries immediately following the procedure. Six weeks later, the patient returned for successful placement of the final restoration and veneers (Image 4).

