By Jean Ocasio, CDA
Our smiles are a very important aspect of our appearance. It is often the first thing someone notices when meeting a person for the first time. If your smile is flawed in some way, it’s easy to understand why you might be self-conscious about it.
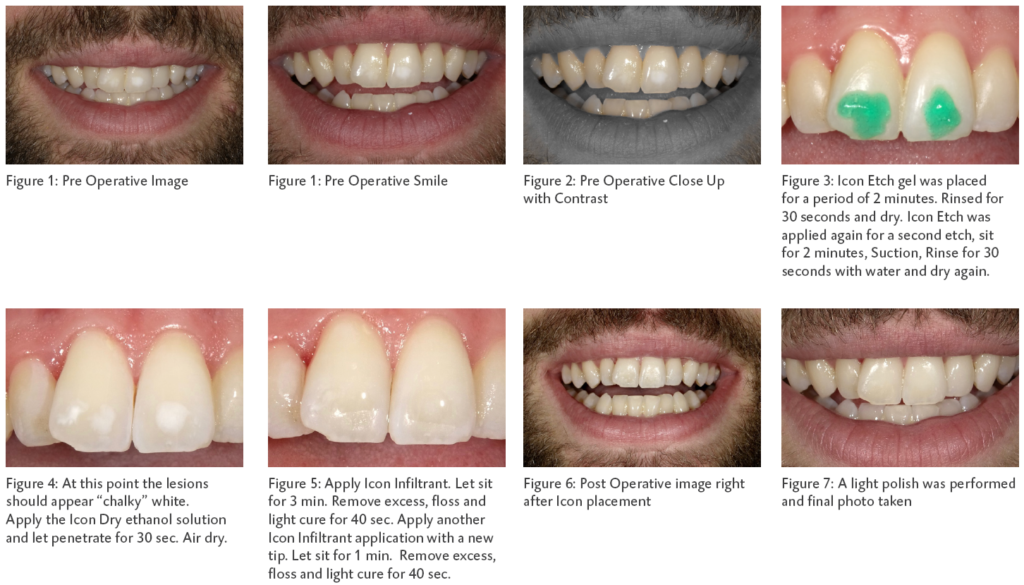
Unfortunately, everyone isn’t born with a picture-perfect smile. Working as the office manager for a cosmetic focus practice, our patients get the smile of their dreams. Michael; our dental assistant was very self-conscious of his white spot lesions on his front teeth and we felt he deserved his perfect smile like our patients.
I heard about ICON by DMG at a course and hoped his might be the answer for Michael. That following week, we had an opening in our schedule and decided, no time like the present. We got Michael in the chair, and the magic happened.
Why was it important to try ICON?
Every day in our practice, we observe areas of demineralization that are too small to restore but require attention and treatment. Historically in our practice we had two options for treating these lessons:
1. Remineralization therapies for those too small to restore
2. Final restorative procedures on those that have progressed into dentin
The innovative treatment utilizes a special “high-penetration” resin (Icon® – DMG America) which is drawn into the lesion by capillary action. Once inside the lesion, the resin sets up a barrier which research has shown substantially reduces the progression of lesions. Because Icon is encased within the enamel, below the surface, it is not subject to the normal wear and marginal discoloration that affects traditional composite restorations.
How does Icon treat white spot lesions?
It has been determined that de-mineralized lesions on anterior teeth (carious white spot lesions) have a “thicker” surface inhibiting zone (or pseudo intact layer). This is the layer that covers the pore structure of the lesion. Insufficient removal of this layer will affect the future esthetic outcome of the Icon procedure.
This layer is removed with the included Icon Etch gel in each Icon patient pack. It is recommended that the Icon-Etch process be performed two times, unless the white spots being treated are less than 2 months old. If white spots are still visible after the Icon-Dry application, then a third etching process is recommended.
In addition to stopping the progression of a white spot lesion, Icon’s light refractory index is close to that of healthy enamel. When Icon infiltrates the lesion, the results look like healthy enamel.
Icon creates a diffusion barrier within the lesion so caries causing acids are blocked from entering and the demineralization process is stopped. Icon is for incipient interproximal decay, just into the dentin/enamel junction and for smooth surface carious white spot lesions caused by the patient not removing biofilm or demineralization from orthodontic treatment. Icon is not for developmental white spot lesions, dental fluorosis, and enamel hypoplasia or for those sites where the white spots have been there for life. Those are the areas where you want to use the MI paste or other remineralization therapies. For Icon, you must have a carious involvement, a carious pore system for the infiltrate to penetrate. Icon is not a remineralization product or for use in occlusal pits and fissures.
How do you use it?
First, the Icon kits provide everything necessary for treatment except the rubber dam, including specially designed dental wedges, smooth surface tips, and customized perforated tips for interproximal, individual syringes filled with Icon-Etch, Icon-Dry (ethanol), Icon-Infiltrant, and both written and diagrammatic instructions. All syringes come in a special screw-type applicator to ensure the materials are gently and slowly extruded onto the surface areas.
Next, always check the interproximal contact area with dental floss prior to Icon treatment to determine the tightness of the contact. By determining the nature of the contacts at the time of discovery, the dentists will be much better prepared at the time of the Icon treatment.
If you have difficulty placing the Icon proximal applicators tip in tight-fitting contact areas, you can place an orthodontic separator between teeth prior to treatment.
Instructions
Step 1: Clean surface and floss, then apply clamp free rubber dam to insure absolute dryness.
Step 2: Apply Icon Etch gel for a period of 2 minutes.
Step 3: Suction, then rinse for 30 seconds with water and dry with oil free air.
Step 4: Apply etch gel for second etch. Let sit for 2 min. Suction then rinse for 30 sec. with water
and air dry again.
Step 5: At this point the lesions should appear “chalky” white. Apply the Icon Dry ethanol solution
and let penetrate for 30 sec. Air dry.
Step 6: Apply Icon Infiltrant. Let sit for 3 min. Remove excess, floss and light cure for 40 sec.
Step 7: Apply another Icon Infiltrant application with a new tip. Let sit for 1 min. Remove excess,
floss and light cure for 40 sec.
Step 8: Slight polish with polishing cup if needed
Conclusion
As the Office Manager, it is important to have various treatment options for our patient’s. In our practice we try to take the least amount of dentistry to give the patient what they are looking for. ICON from DMG, gives us that ability with confidence. Michael is smiling every day, and that gives us a reason to smile knowing we were able to conserve healthy tooth structure without destroying healthy enamel.

