by Raffi Leblebijian, DDS
With implant expansion, doctors can optimize their skills with 3D printed surgical guide implant placement. This article will assist in achieving optimal, safe, and efficient results using these guided implant surgery skills. Specifically, this article will cover the digital approach to guided surgery and how to use STL and DICOM files for the planning, and fabrication of guides.
The underlying theme of this article is that using surgical guides doesn’t make it easier; it just makes it better.
STL and DICOM
Guided implant surgery requires the use of both STL (stereolithography) and DICOM (digital imaging and communications in medicine) technologies.
STL is used to describe the surface geometry of a three-dimensional object and has become the data
format that most 3D printers and CAD/CAM milling systems require. For example, in a dental office, an intraoral scanner will output in STL format.
There are two ways to take dental impressions for guided implant surgery and many dental procedures: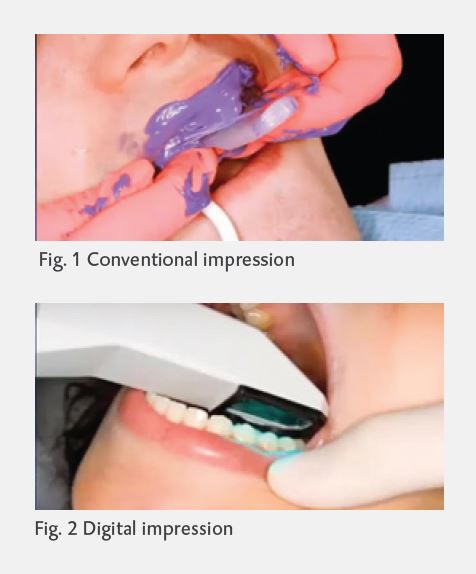
- The conventional method, typically uses polyvinyl siloxane, or PVS, impression material, such as Honigum Pro by DMG (Fig. 1). PVS is better for accuracy and stability than alginate material.
- The digital method uses a digital scanner (Fig. 2). It is similar the technology used to make clear braces and aligners. The image is then used to print a model.
In most cases, conventional impressions are scanned and – like digital impressions – used to print the prostheses using STL digital files.
Next, we need a DICOM, which dentistry uses to ensure  consistency in image file format when creating digital radiographs. The ultimate DICOM technology is in CBCT (cone beam computer tomography) equipment (Fig. 3). CBCT machines are expensive, but you can rent mobile ones that are delivered to your office. They combine DICOM and STL in their software.
The DICOM breaks the volume into slices, and the STL format breaks the surface of the volume into “tiles” that are typically triangular. The DICOM file provides information about what’s inside the volume – such as bone density – while the STL file delivers information about the surface of the volume.
When creating a plan for an implant, both types of information, STL and DICOM, become very useful. It is particularly true when producing surgical guide since it utilizes information underneath the surface as well as the surface itself including the soft tissue.
Guided surgery
There are numerous advantages to guided surgery; it:
- reduces the risk of failure
- increases consistency, accuracy, reliability and predictability
- helps avoid the need for flap surgery
- is less invasive
- reduces the need for irrigation
There are, however, some disadvantages to guided surgery; it can:
- be difficult with small mouths because the osteotomy burs available are significantly longer
than traditional free-handed osteotomy burs
- take more time due to the need to create and combine an STL and a DICOM, prepare a plan,
and print the guide. (Note: While it’s technically possible to complete the entire procedure in
2-to-3 days, it usually takes as long as a week or two.) - require the purchase of equipment (e.g., CBCT), planning software (whether you use your own software or an outside software firm to do the planning), and 3D-printed guides (Fig. 4).
Non-guided Surgery
There are a few advantages of non-guided – or free-handed – surgery:
- it can be performed in a small mouth
- it is less expensive than guided surgery
- it can be quicker (although you still have to plan the type of restoration you’re going to do, consider all the aspects of human biology and any medications the patient is taking, and what type of implant they want)
There are also several disadvantages to non-guided surgery:
- it involves a higher risk of failure
- it requires guessing about the correct location for the implants
- you are not able to plan exactly where everything goes
- you don’t know where the critical landmarks are located
- you don’t know the proper angulation of the implant relative to the mandible and maxilla
- you don’t know the exact location of the foramens
- you don’t know how close the implant is to the tooth or the implant next to it
- requires more radiographs to confirm angulation & anatomy
- necessitates flap surgery, which requires that the flap be sutured and closed and hence
increases surgery time.
 Fig. 5 shows images of free-handed implants that were poorly placed. Your patients may find photos like this on the Internet and ask you if this is what their implants will look like if you take a non-guided approach.
While I’m certainly a fan of guided surgery, I recommend that you do free-handed surgery before focusing on guided surgery. One reason is that if you’re doing guided surgery and your guide gets damaged, you’ll be able to shift gears and complete the surgery free-handedly.
Case
A long-time male patient presented with some radiolucency (Fig. 6) and a draining fistula in #7 (Fig. 7).
After discussing options, the patient decided to get an implant. After taking an STL and a DICOM, I determined that we could do an immediate implant. (Note: #8 is an implant crown.) By the time the patient returned in a few weeks, I had done my planning based on the STL and DICOM.
In Fig. 8, you can see that #7 is not restorable. The good news is that there’s a lot of native bone available for the primary stability, seemingly confirming my earlier assessment that an immediate implant would be possible.
I made a guide and extracted the tooth, revealing the draining fistula to be larger than I had expected (Fig. 8).
Inside the fistula, I found and removed a pus bag (Fig. 9), which made me realize that all my planning was not usable. The moral: even the best planning can’t always prevent
surprises.
The pus bag was so big that it plugged up the suction. While the guide fit well, there was much more loss of bone structure on the buccal distal aspect than I had anticipated.
I then performed a guided bone regeneration. While my planning had assumed a 5-wall defect, the
severity of the draining fistula meant that I would be dealing with a 3-wall defect. Still, I was able to
create a healthier socket and give the patient a temporary so he could leave the practice with his
smile and functionality intact.
 The patient returned 14 weeks later, and we started over. I took a new STL and a new DICOM.
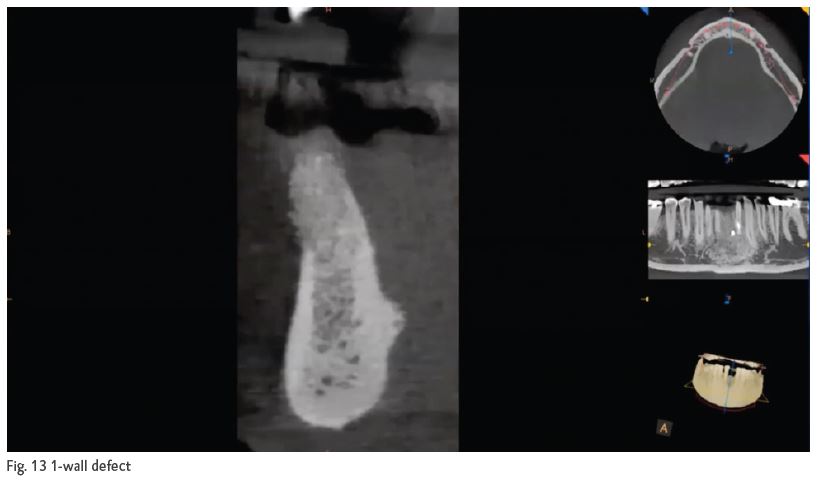
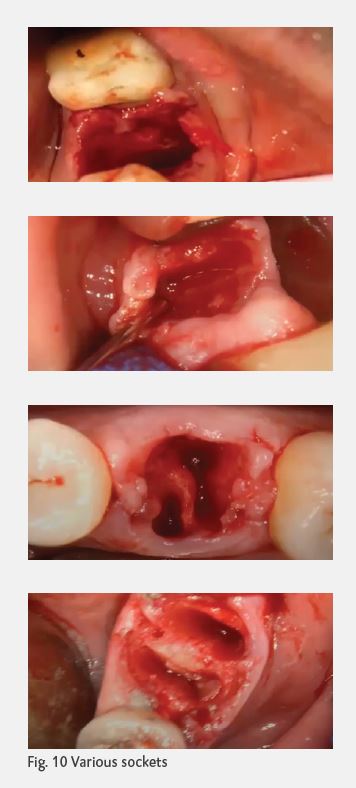
The success of the implant, whether guided or free-handed, is determined by how well the bone holds the implant, which in turn, is determined by the quality of the initial integration and how much bone structure there is. It’s important to have experience working in a variety of sockets and getting familiar with 5-wall defect, 3-wall defect, and the very challenging 1-wall defect (Fig. 10).
Because you never know how patients will present when they come into your office, it’s a good idea to make sure you always have a good inventory of – and plenty of experience using – various types of bone, including;
- The means of harvesting the patient’s autogenous bone
- Allograft bone
- Xenograft bone
- Synthetic bone
Again, even if you do guided implants, I highly recommend gaining experience doing free-handed implants.
The role of CBCT
Cone beam computer tomography is a variation of traditional computer tomography. It’s used for
accurate, three-dimensional imaging of hard tissue structures and can measure bone, soft tissue
thickness, vital structures, root anatomy, and proximity of adjacent teeth. CBCT images can be
effectively used to educate patients.
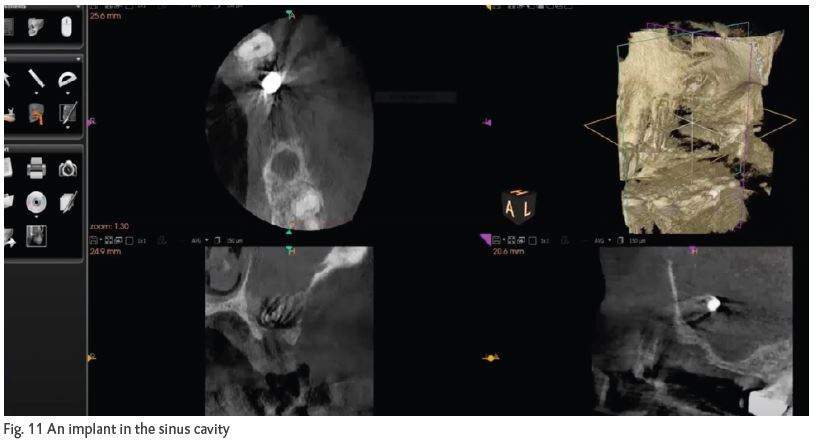
In my early days of doing implants, CBCT technology enabled me to discover that an implant
found its way into the sinus cavity (Fig. 11). Fortunately, I was able to retrieve it with the help
of an experienced colleague, and CBCT made the retrieval process easier than it would otherwise
have been.
The figure 12 to the right provides you a sense of all the landmarks you can see with CBCT, such as
the septum.
The figure 13 shows an example of a 1-wall defect.
Guide kits for implants
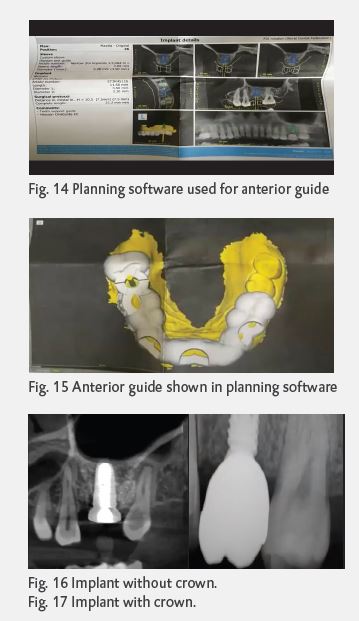 There are many manufacturers offering guide kits for implants. Whichever one you use, it’s important to create a detailed plan prior to starting the implant procedure. Fig. 14 shows a plan I used for a case. The plan provides details for all aspects of the implant such as precise placement, crown placement, and so on. Effective planning will only improve the stability you are to achieve and reduce any risk of peri-implantitis. Fig. 15 shows what the anterior guide looks like in the planning software. Fig. 16 shows a radiograph of the implant before placement of the crown, and the radiograph in Fig. 17 shows the implant with the crown placed.
Guide planning
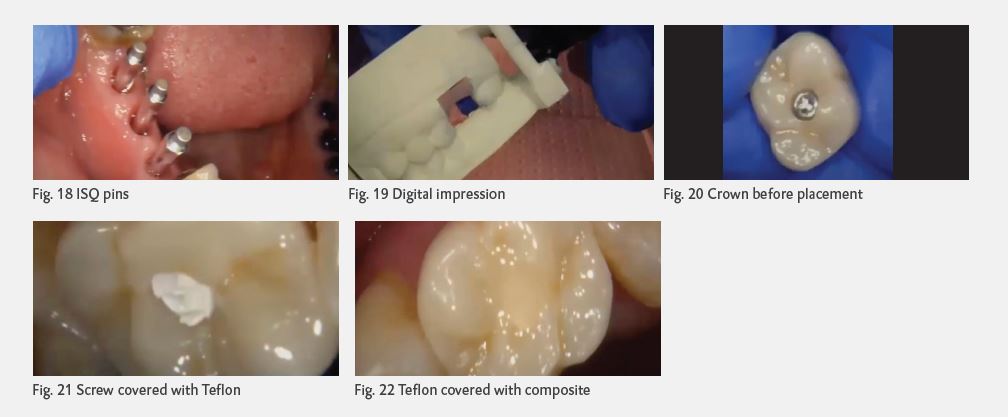
After I place the implant but before I take the impression, I get a reading of the ISQ: the integrated
system quantifier. You generally want an ISQ of at least 75, and in this case, the score was 80.
(Another term for this reading is BIC: the bone-implant connection.) Fig. 18 shows the ISQ pins
used to calculate the score.
Figure 19 shows a digital impression. Figures 20 – 22 show a crown with a screw, with the screw
covered with Teflon, and with the Teflon covered with composite, respectively.
There are four basic ways to support the guide: Tooth-supported (fig. 23), tissue-supported
(fig. 24, bone-supported (fig. 26), and a hybrid tooth-&-tissue-supported (fig. 26).
There are numerous uses for guides, including:
 Single tooth implant
- Multiple implants
- Immediate implant placement
- Sinus lift
- Temporary
- Premade temporary crowns
Single tooth guided implant
For a single tooth guide (Fig. 27) – or any guide – always make sure the guide locks in.
Depending on the lab used, there are different guide shapes and materials. Figure 28 shows one such alternative guide type. However, it is printed, and the planning process is the same.
Figures 29-31 show the soft tissue following the tissue punch, the osteotomy process, and the measurement of the distance between the tissue and the bone with a probe, respectively.
Multiple teeth guided implants
Once you experience placing several single tooth implants, you’ll be ready to take on multiple tooth implants for adjacent teeth or cross arches. The planning process is the same. Figure 32 shows a multiple tooth guide and the implant abutments it facilitated.
Figure 33 shows a guide for six teeth. Figure 34 shows the area before the guide has been placed, and Figure 35 shows the guide in place.
One interesting debate that occasionally arises with multiple teeth implants is: Do we place individual crowns after the implants are placed, or do we bridge them? In this case, I opted to place individual crowns, but lately I’ve been pursuing the bridging option more. The issue, of course, is ensuring that adequate hygiene can be maintained.
 By the way, if you’re doing multiple teeth implants, you’ll want to use scan copings (Fig. 36) to duplicate the shape and position of the implant abutment interface during the digital impression process to precisely position the implant analog in the working model.
Figure 37 shows the seven-year-old implants of a patient who recently came in for his six-month checkup. The tissues are healthy and firm, because the patient flosses regularly and comes in for his checkups religiously.
Sinus lifts
There are also guide kits for all types of sinus lifts: crestal, horizontal, hydraulic and vertical.
The process for a sinus lift – in this case, a hydraulic lift – is essentially this:
- Put the guide in place
- Do the tissue punch and open it up with a full thickness flap (FIG. 38)
- Do a hydraulic lift (Fig. 39)
- Grafting bone material
- Place the implant
- Suture it
In Figure 39, you can see the dome of bone created with the hydraulic sinus lift.
After allowing the osteoplastic action to take effect and the initial integration to occur, the patient should return in about 14 days to have the implant (Fig. 41) and crown (Fig. 42) placed.
Of course, it’s also possible to do multiple sinus lifts simultaneously (Fig. 43).
Suturing
 Figure 44 shows a Teflon suture. Teflon sutures can be resorbable or non-resorbable. The disadvantage of Teflon is that it’s a little difficult to get a nice, tight knot than with silk.
Edentulous patients
Edentulous patients, understandably, generally come into the practice with numerous demands. They want:
- The latest and greatest solutions
- Great esthetics
- Great function
- and NOT look older than they are
As depicted by the diagram in figure 45, there are several decisions to be made with edentulous patients.
- If the teeth can be saved, there are several possible approaches
- If the teeth cannot be saved, there are numerous decisions for the patient to make with the benefit of your counsel
- Should we extract?
- If we do extract, should they be extracted all at once, or one at a time?
- Which teeth should be replaced?
- For those teeth that are replaced, should they be replaced with removable prosthetics, or with non-removable prosthetics?
If the patient chooses removable prosthetics, the main options are:
- Traditional dentures
- Implant-supported removable dentures
If the choice is non-removable prosthetics, the main options are:
Figure 46 shows a guide placed on the upper arch of an edentulous patient who has chosen to have six implants placed. Figure 47 shows the six abutments placed, and figure 48 shows the post-op view.
For an edentulous patient who wants a temporary denture to wear while waiting for the implants to be integrated, I prep the full arch for the teeth we want to save in the interim and make a PMMA roundhouse that’s cemented over the saved teeth.
We want to save whatever teeth we can because natural teeth provide the best support for guided surgery. The saved teeth are referred to as “strategic abutments,” even if they’re not necessarily where the implants are going to be placed. If you’re doing grafting, you certainly don’t want a tissue-supported denture in the interim.
While I give the patient the choice between a removable and non-removable denture, I recommended the latter to the patient shown in fig. 49.
There’s a nice 5-wall defect, the septic, bones are solid, and there’s plenty of room for a pontic and soft tissue development. If needed, I could easily add to the area with flowable and contour it as it’s healing over the next 3-to-4 months. And since we’re doing guided bone regeneration and the digital information is in the computer, it can be easily replicated in the event of failure or fracture.
Fig. 49 Patient with a 5-wall defect and ample room for a pontic and soft tissue development
On occasion, you might have a situation where the guide does not fit well due to tissue impingement that causes some blanching. If this happens, you might be able to adjust the guide rather than creating significant inconvenience for the patient by having to start over and print a new guide. Examining the original stone or printed model will help you make the adjustment.
It’s not always necessary to open a full-thickness flap with guided surgery, but when it is, you might consider using healing caps if there is adequate stability. You can contour the soft tissue around the cap. The combination of using a guide, tissue punch, and a flap can provide ideal primary closure. Also, using a flap allows you to go back in after the guide has been removed and move the internal hex a quarter turn in one direction or the other or sink it half a millimeter or so. Also, if you’re using machine-collared implants, you can avoid having to countersink, and hygiene maintenance is easier.
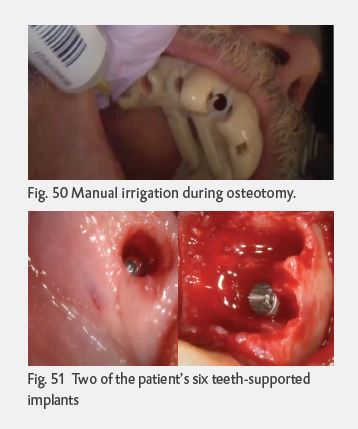 One issue with a guide is that it can reduce the amount of irrigation that hits the point of contact with the osteotomy and the bur. This can increase the risk of burning the bone. Fortunately, many new keyless, C-shaped bur designs or burs with grooves can draw the irrigation down to the interface. It may also be necessary to have your assistant manually irrigate during the osteotomy (Fig. 50).
Figures 51 shows two of a patient’s six guided, teeth-supported immediate implants. Bone was packed, including the patient’s bone that was harvested, and complete closure was accomplished.
Figures 52 shows two more images from the same patient, include a collagen plug and cross-arch sutures.
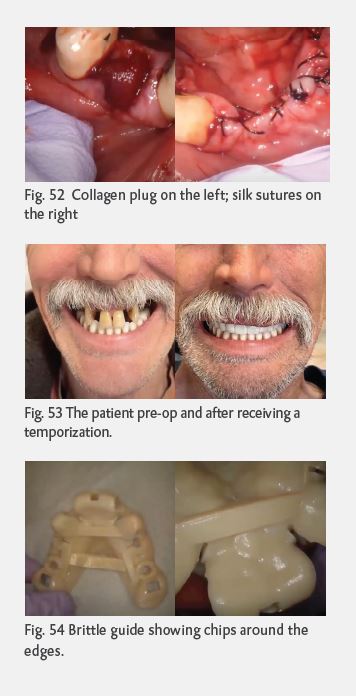 Fig. 53 shows a pre-op photo of the patient – on whom I placed lower implants two years ago – and the patient with a temporary, removable, implant-supported PMMA that I placed on the day of the extractions. The temporization, which features temporary cylinders and abutments, will be duplicated and replaced with permanent restoration once healing has been completed
in 4-to-6 weeks.
It’s important to note that not all guides are created equal. Figure 54 shows images of a guide I no longer use due to its brittleness and chips along the edges.
It doesn’t get easier; you just get better
As you gain experience doing free-handed and then guided implant surgery, it might seem like the procedures are getting easier. The fact, however, is that they’re not easier; you’re getting better.
About the Author
Dr. Raffi Leblebijian, who owns and operates a family and cosmetic dentistry practice in Chicago
and Bourbonnais, Illinois has been practicing for 36 years. Dr. Raffi, as he is affectionately known
by his patients and staff, is a graduate of Loyola University Dental School and the Las Vegas
Institute of Advanced Dental Studies. Founder of International Institute of Implant & Restorative
Dentistry (IIIRD).
