By Dr. Ian Shuman
The Hydraulic and Hydrophobic (H&H) technique perfectly captures deep subgingival marginal details without the need for packing cord. By using advanced new materials like the StatusBlue alginate replacement, Honigum Pro VPS impression system and LuxaCrown semi-permanent crown and bridge material, as well as an updated process, the H&H technique can be applied to nearly all impression manners for extremely accurate and detailed impressions.
Pre-Prep Impression for Provisional Fabrication
Polyvinyl siloxane (pvs) is an ideal material choice for the fabrication of provisional impressions. It is extremely accurate and reusable and, unlike traditional alginate, impressions made with pvs can be kept for many years.
If a tooth has a guarded prognosis, it’s best to perform a procedure that will attempt to solve the problem chairside. If no endodontic work has occurred, a long-term provisional crown is an excellent treatment choice in order to evaluate the health of the tooth and the gingiva, and to determine if the tooth will require root canal therapy. Moreover, if the tooth eventually fractures and becomes non-restorable afterwards, minimal time is invested into the restoration of the tooth.
Case
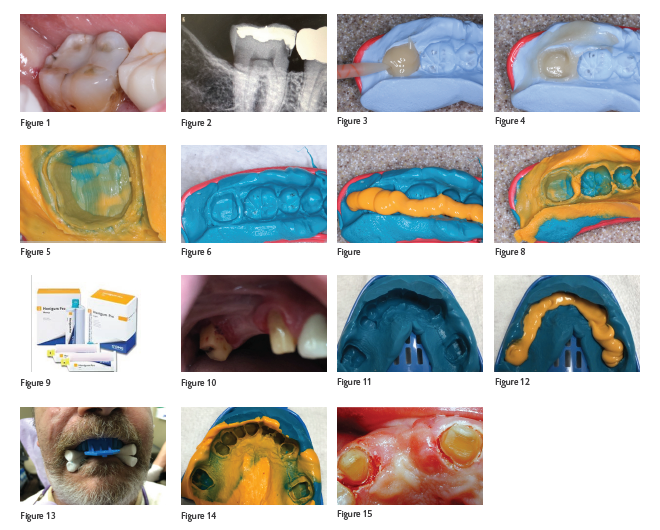
Patient presented with a failing restoration on tooth #18, and deep proximal caries on both mesial and distal sides (Figure 1-2).
Prior to preparing the tooth, a provisional impression is made with StatusBlue (DMG), a medium-body polyvinyl material with a consistency very similar to alginates.
The pre-impression is then filled with LuxaCrown (DMG), a chairside semi-permanent bisacryl composite material designed to last up to five years. Fill the impression all the way up to the margin in order to avoid any insufficient material coverage (Figure 3).
After a mere two minutes, the material has set and is ready for trimming, placement, and cementation (Figure 4).
Final Impression: H&H Technique (The Cordless Impression)
The Hydraulic and Hydrophobic (H&H) Technique uses impression materials and hydraulic pressure to drive a low viscosity polyvinyl siloxane (pvs) impression material deep into the sulcus to capture a perfect impression of the subgingival margin (Figure 5).
Case #1
Here we have a prepped tooth prior to impression.
The final impression is made using a triple tray and Honigum Pro Heavy QuadFast (DMG) impression material (Figure 6). Honigum Pro Heavy QuadFast takes a mere 2 minutes to set.
Due to its thixotropic nature, a heavy-body impression material is not designed to fully capture fine marginal details. With no hydraulic compression, the material is simply not light enough to fill in critical marginal areas.
After complete setting of the base material, the impression is removed, rinsed and dried thoroughly, and a wash material (Honigum Pro QuadFast Light/DMG) is added to the entire surface (Figure 7). Adding only to the prepped tooth creates an imbalance between the actual impression – so be sure to add to the entire surface of the impression (Figure 8).
Using a triple tray under occlusal force, the wash material is hydraulically forced deeply into the sulcus. Its hydrophobic nature displaces the fluids, allowing the wash to deeply penetrate and closely capture the subgingival margins.
Because the heavy-body impression material needs to be strong enough to push the light-body material up into the sulcus, a shore hardness of at least 50- 55 is required for this technique. Honigum Pro has a shore hardness of 62-74 (Figure 9).
Case #2
When doing full arch or quad bridgework, always use separate impression trays with a bite registration for both upper and lower arches. Using a lab blade, trim any excess material and overhang to allow easy entrance into the mouth but not so much as to encroach on the margins of any of the teeth.
Teeth #s 3-6 are prepped for a full-coverage four-unit bridge (Figure 10). Honigum Pro QuadFast Light fast-setting material is used for the final impression base (Figure 11). A thick ribbon of the material is placed to fill all teeth (Figure 12).
Since this impression technique is typically performed with a triple tray, sufficient force must be applied to the single trays being used. Therefore, have the patient bite down on two cotton rolls per side for adequate occlusal pressure in order to allow the light-body material to push
its way up into the sulcus (Figure 13).
Due to excellent penetration depth of the light-body material, the final impression displays exquisite detail of the sulcus, and crisp sharp margins of the prepped teeth (Figure 14-15). Conversely, the light-body material has extremely high toughness when compared with similar products on the market.