 Written by Dr. Jack Ringer, DDS, FAACD, FIADFE
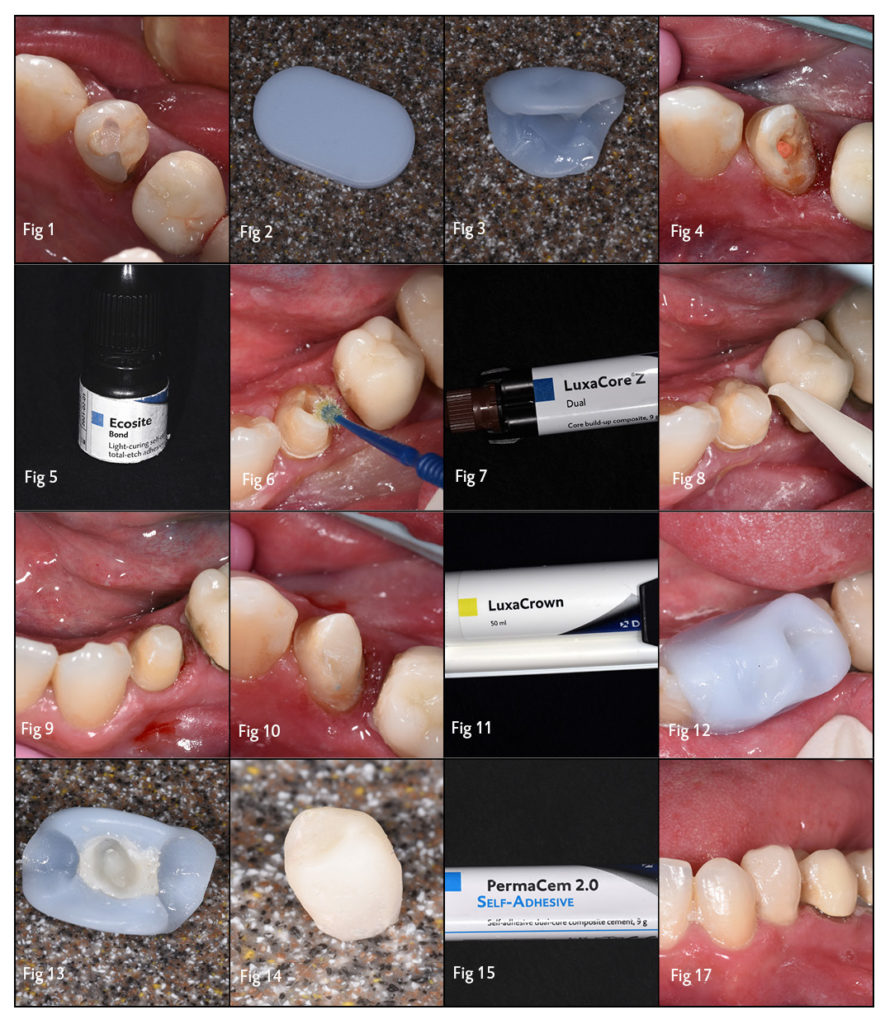
The patient presents with tooth #21 requiring a core build-up and a full coverage restoration (Fig 1). However, the patient must receive extended periodontal and implant therapy before the final restoration will be completed. A long-term provisional needs to be placed as the final restoration would not be manufactured for several months. This paper documents a detailed, step-by-step approach to create the long-term provisional crown and core build-up for this patient; all in an efficient, predictable and inexpensive manner utilizing an esthetic and durable provisional crown and bridge material, LuxaCrown (DMG), and an esthetic and strong core build-up material, LuxaCore Z Dual (DMG).
Step 1: Develop a Stent for Provisional Fabrication
Prior to tooth preparation, a stent is made as a template for the future provisional restoration. The technique chosen for creating the stent utilizes Thermoplastic Buttons (Premier) (Fig 2) that are heated and then molded on the tooth to be prepared. Once hardened, it is set aside until the provisional is made (Fig 3). This technique is extremely efficient, inexpensive and creates a highly accurate duplicate of the pre-prepared tooth.
Step 2: Basic Tooth Preparation
Following the basic preparation and removal of any caries or previous restorative material for tooth #21 (Fig 4), it is necessary to augment the missing tooth structure with a core build-up to help ensure optimal retention for the planned indirect restoration. Utilizing adhesive technology assures the dentist that the core build-up will be securely adhered to the prepared tooth structure, eliminating the need to reduce more tooth structure to create retentive undercuts. Various resin adhesive systems can be utilized, be it self-cure, light cure, or dual cure.
For this case, Ecosite Bond (DMG) (Fig 5), a light-cure bonding agent was used. Keeping the tooth moist, i.e., not wet or desiccated, Ecosite Bond (DMG) is scrubbed onto the tooth for approximately 10 seconds followed by air drying to remove any solvents (Fig 6). The adhesive is then light-cured for ten seconds. A second layer is applied to increase bond strength.
Step 3: Applying the Core Build-up and Final Tooth Preparation
LuxaCore Z Dual (DMG) (Fig 7), was utilized as the core-build-up material. It has several properties that make it the ideal choice for a core material, including: radio-opacity, dual cure, does not slump, easy syringe application, strong and esthetic. Following the application of the adhesive, the core material is injected in the deficient area of the tooth, hand instrumented to a basic accepted shape and light cured (Fig 8). It cures areas where one feels a light source will not be adequate. This is followed by fine tuning the core build-up shape and the final tooth preparation (Figs 9, 10). In those cases where the definitive restoration will immediately follow, the final digital or analog impression is taken and both the shade and materials are selected.
Step 4: Fabricating and Cementing the Provisional Restoration
As the patient in this case will be going through extended periodontal therapy before the final restoration will be manufactured, it is necessary that the provisional restoration is biologically sound, esthetic, functional, long-lasting and inexpensive. Therefore, LuxaCrown (DMG) (Fig 11) is utilized as it fulfills these requirements. LuxaCrown (DMG) is a unique restorative material that is glass filled, making it far more durable than conventional provisional materials, yet it is highly esthetic and dispensed like conventional provisional materials, e.g., Luxatemp (DMG).
Using the prefabricated thermoplastic button stent, LuxaCrown (DMG) (in a shade closely similar to the adjacent dentition) is injected into the stent. The stent is then seated onto the prepared tooth #21 (Fig 12). After the LuxaCrown has chemically cured, it is removed from the stent, trimmed, and polished (Fig 13, 14).
Step 5: Seating and Cementing the Provisional Restoration
The decision to use a temporary or permanent cement is based on how retentive the provisional crown is and if the LuxaCrown (DMG) provisional was designed to be a “long-term temporary” restoration (as in this case) or a “short-term permanent” restoration, i.e., up to 5 years. For our patient, the provisional crown would need to remain in the mouth for several months, so a self-adhesive permanent cement was used PermaCem 2.0 (DMG) (Fig 15). The cement was injected into the crown and seated on the prepared tooth, and the excess wiped off then light cured. As this cement is a dual-cure cement, light curing is optional (Fig 16, 17).
The dentist can have confidence that this crown will maintain its integrity and adhesion during the protracted therapy, assuming the patient maintains proper hygiene and doesn’t abuse the restoration. The patient can also feel confident that the provisional will be comfortable, easily cleansed and remain firmly adhered to the tooth until the final restoration is to be manufactured.

